It was obvious pretty early on when setting up my configuration that spellcasting was not going to be my biggest problem; movement was. Because while using abilities and casting spells, opening and closing interface panels, and even targeting other players are very binary actions, it is infeasible to play without the analog mouselook feature (I tried). I have had good luck using a SmartNav: EG head tracker at work, an assistive device I had purchased out-of-pocket to reduce my use of the mouse as a software developer. This camera tracks the movement of a small, reflective silver dot that you wear somewhere on the top of your head. That movement is then translated into mouse movement on-screen. Once I was certain of its efficacy, I requested that my work buy one for my use at the office so that I could take the one I had purchased home.
To hopefully pique your interest, I have created a short video of me demonstrating all of the techniques in this post:
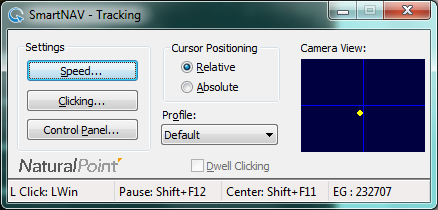
Configuring the SmartNav
The SmartNav works well for everyday computer use, however, when I activated mouselook in-game, it caused the camera to quickly spin in circles, making it completely unusable. It was only after a couple of days of searching and adjusting settings that I was able to determine how to overcome this issue. The key, I found, was in two settings within the SmartNav Control Panel:
Cursor Positioning
To use this device in-game, there are two settings that must be specifically configured. The first is Cursor Positioning, a setting which can be set to either Absolute or Relative. As explained in the online manual:
Relative Mode
Works in the same kind of way that a regular mouse does, bumping the cursor against the edge of the screen allows the user to change the relationship between their head position and the location of the cursor on the screen. Pressing the Center Hotkey will re-center the cursor on the screen.
Absolute Mode
Allows a fixed relationship to be set up between the head location and the cursor position. Bumping the cursor against the edges of the screen will not change the relationship of the cursor to the user’s head position. Pressing the Center Hotkey will reset the relationship and re-center the cursor on the screen.
To use a SmartNav device in World of Warcraft, you must set the Cursor Positioning setting to Relative. To do so:
- Double-click on the SmartNav icon in your system tray or open the application from the shortcut in your Start Menu.
- Under the Cursor Positioning toggle, select Relative.
Mouse Override Delay
By default, the SmartNav is in Absolute mode, and I noticed a big improvement when switching to Relative. It did not, however, completely resolve my problem. The second setting that has to be changed from its default value is the Mouse Override Delay setting. From the use manual:
The Mouse Override Delay Slider Bar controls how long cursor control is released to the Mouse when the SmartNav detects that the Mouse is being moved. The setting range is from 0-10 seconds.
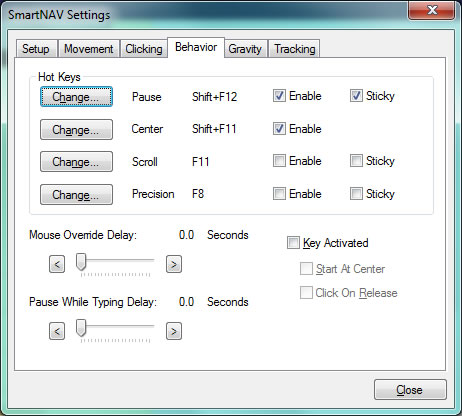
Setting this to any other value beside 0 will cause your camera to spin uncontrollably when you have engaged mouselook.
Keybindings and Voice Commands
You will also need to keybind the Center command which will automatically re-center your mouse cursor when pressed. In my case, I’ve keybound it to Shift+F11*, but you can use any keybind that does not otherwise conflict with what you’ll be using in-game. It is also useful to set a keybinding for toggling the SmartNav on and off as there may (hopefully rarely) be times when you require the accuracy of a mouse. I bound this action to Shift+F12*.
For certain keybinds, most notably those that involve a modifier key (CTRL, ALT, or SHIFT) along with a Function Key (F1..F12), you must copy the Vocola Keys extension to your voice commands directory (more detailed instructions on extensions available here). Alternately, you can just find another key to bind to, but it needs to be one that you don’t use on a day-to-day basis (i.e., one that triggers another action in-game).
Once you have keybound the center and pause features, add voice commands to your global voice commands file, _vocola.vcl — easily accessed by saying Edit Global Voice Commands — to automatically re-center your mouse cursor:
center mouse = Keys.SendInput({Shift+f11}); #Requires Keys extension
toggle SmartNav	= Keys.SendInput({Shift+f12}); #Requires Keys extension
Using Mouselook
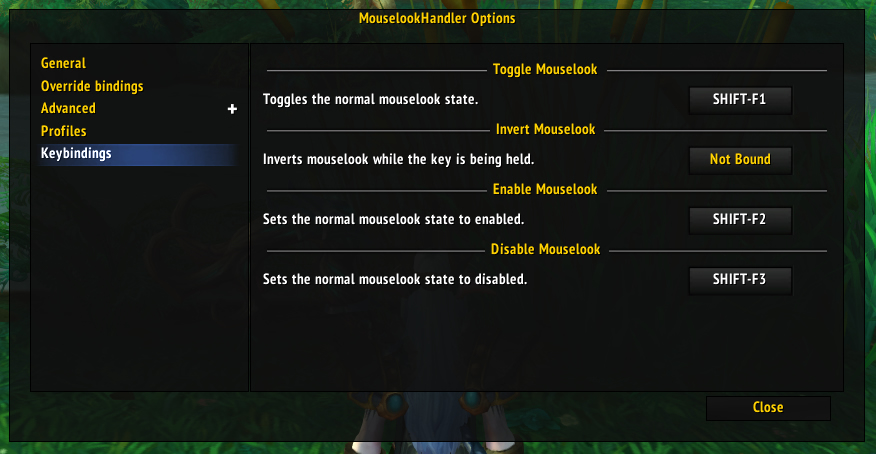
Once you have successfully configured the SmartNav head tracker and verified that your mouse moves smoothly when mouselook is engaged (typically by holding down your right mouse button), you will need to install an addon that allows you to keybind the activation of mouselook (we will later link this keybind with other actions). I use MouselookHandler by Meribold. Once installed, open its configuration menu by typing /mh in-game. Go to the Keybindings tab and bind keys to Toggle Mouselook, Enable Mouselook and Disable Mouselook:
Now add voice commands which correspond to these keybindings to your wow-64.vcl file:
toggle mouselook = Keys.SendInput({Shift+f1});
("enable mouselook" | "look around") = Keys.SendInput({Shift+f2});
disable mouselook = Keys.SendInput({Shift+f3});
Running Around
Before developing RSI, I would run around by holding the left and right mouse buttons down at the same time. But by combining the mouselook keybinding with autorun, I can run around completely hands-free, leaning left or right to turn. With a few environmentally contextual aliases thrown in, my “run” command looks like this:
(run | fly | ride) = Keys.SendInput({Shift+f11}) + {Shift+Up} + Keys.SendInput({Shift+f2});
In this case:
- Shift+f11 centers the mouse (configured through the SmartNav control panel).
- Shift+Up activates auto-run (re-configured through in-game keybindings).
- Shift+f2 activates mouselook (configured through the MouselookHandler addon).
And, of course, the corresponding “stop” voice command:
stop = {Down_1} + Keys.SendInput({Shift+f3});
This presses the down key once to disable auto-run and uses the previously bound Shift+f3 to disable mouselook. Some additionally useful movement-related commands:
# auto-follow my focus and disable mouselook (in-case it was active from running)
auto follow = "/follow focus"{Enter} + Keys.SendInput({Shift+f11}) + Keys.SendInput({Shift+f3});
# disable mouselook and re-enable it 1 sec later (useful for spiral staircases)
re-center = Keys.SendInput({Shift+f3}) + Wait(1000) + Keys.SendInput({Shift+f11}) + Keys.SendInput({Shift+f2});
# hold down/release space (useful for take-off when flying or swimming upward)
(hold|release) space = Keys.SendInput({space_$1});
Camera Angles
To ensure you have full awareness of your surroundings, you will want to create voice commands that switch among various, useful camera angles. By default, you can switch among the initial camera angles using the Home and End keys. However, these camera angles aren’t as useful as they could be. The Camera section of the in-game keybindings menu allows you to bind keys for setting up to 5 different camera angles. I bound the Save View 1-5 keys to function keys 1-5 (F1, F2, etc.), positioned my camera into angles I thought I would find useful, used the newly-created keybinds to save the new angles, then re-bound those function keys to the Set View 1-5 keybinds. Then I created voice commands which are descriptive of the camera angles I created:
first person = {f1};
selfie = {f2};
zoom out = {f3};
overhead = {f4};
under camera = {f5};
first person = {f1}; 
selfie = {f2}; 
zoom out = {f3}; 
overhead = {f4}; 
under camera = {f5}; Note: Special thanks to user satorigreen at the NaturalPoint forums for his post regarding the Mouse and Keyboard Override Delay and to user Carmidian for his response to the same post regarding the Cursor Positioning setting.
I always fall of those circulars — especially in Booty Bay.
This is very fascinating, I hope to see more!
Thanks! The worst ones are the ones in Black Rook Hold with the giant boulders that roll down and smoosh you. I look forward to making another video the next time I release a voice dictation post. 🙂
And thank you for the excellent shout-out on your blog!
Thank you so useful, just set up all this for myself with smartNav and dragon and vocola. Thank you for this perfect guide that has allowed me to play again 🙂